Use Flask-Nav3 with Flask Blueprints
Posted on Mon 27 May 2024 in Flask
I previously reviewed the Flask-Menu Flask extension and I really liked the way it allowed me to build navigation bar logic into separate blueprint files. This enabled me to keep my blueprints relatively independent from other blueprints and the main application.
I wanted to see if I could implement a navbar in the same way using Flask-Nav3. Flask-Nav3 is more actively maintained than Flask-Menu and supports the latest version of Flask and Flask-security-Too.
This post describes my solution to that problem.
A quick Flask-Nav3 review
Flask-Nav3 is a fork of Flask-Nav, which was a popular navigation menu package that is no longer maintained. At the time I write this post, the Flask-Nav3 developers added Python 3.12 and Bootstrap5 support. Flask-Nav3 is at version 0.7.2, released March 12, 2024.
Flask-Nav3 is a relatively new project with only two stars in GitHub (I added a third star). Flask-Nav3 does not have its own documentation and it simply points to Flask-Nav's documentation. This is OK, because its functionality is the same. But, the Flask-Nav docs are very lightweight and it would be great to see some more examples of how to use Flask-Nav3.
Flask-Nav3 works the same as Flask-Nav so you can refer to old answers on StackOverflow or to old blog posts for help using it.
I think Flask-Nav3 is most useful when you need a way to build complex navigation bars and if you want to separate the navigation bar content from its formatting. That is, when you want all the navbar's program logic to be in your Python program and your navbar's formatting code to be in either a custom renderer or in a template.
Integrating navbar creation with Flask Blueprints
The Flask-Nav documentation shows users how to create navigation menus in the main Flask application file, but does not explain how to implement them in Flask Blueprints. This is probably because it is much simpler to keep the logic related to a global navbar centralized in the main application context.
It is possible to use Flask-Nav with blueprints to manage a global navigation bar. However, you need to carefully manage the application context.
Create a static navbar in an existing app
The method I created is suitable for creating static navigation menus. It automatically adds to the global navigation bar navigation items that are defined in each blueprint. The order of items is determined by the order in which the Flask application registers each blueprint.
The base application
I used Flask-Nav3 to add a simple navigation menu to my current project, a small Flask app that has two pages. Follow along with that post to build the application or get the code directly from GitHub and run it, as shown below:
$ wget https://github.com/blinklet/music-festival-organizer/archive/refs/tags/0.002.zip
$ unzip 0.002.zip
$ ls -1
0.002.zip
music-festival-organizer-0.002
$ cd music-festival-organizer-0.002
$ python3 -m venv .venv
$ source .venv/bin/activate
(.venv) $ flask --app mfo.app database create
(.venv) $ sh ../tests/make-users.sh
(.venv) $ flask --app mfo.app run --debug
You will see that, if you log into the app as the admin user, [email protected] with the password abcd1234, the app provides two routes: https://localhost:5000/ and https://localhost:5000/admin, as shown below:
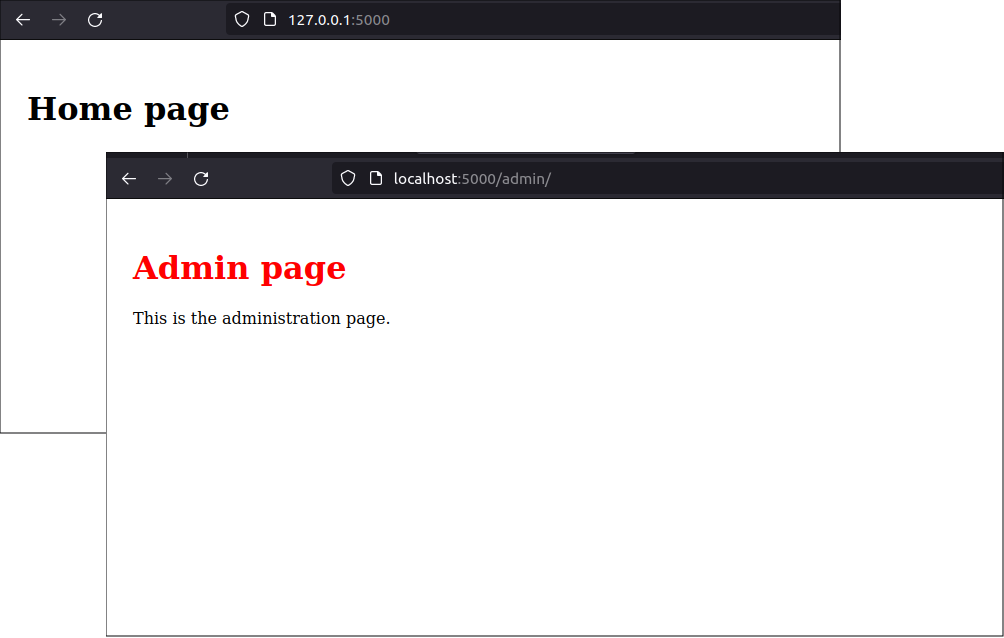
But, the application does not have a navigation bar that allows user to easily switch between the admin and home pages.
Install Flask-Nav3
To install Flask-Nav3, add it to the project's requirements.txt file:
$ nano requirements.txt
The new requirements.txt file will be as follows:
# requirements.txt

flask
python-dotenv
Flask-Security-Too[fsqla,common]
Flask-Nav3
Then, run the command:
(.venv) $ pip install --force-reinstall -r requirements.txt
Create the nav instance
Create a new module in the application folder named nav.py.
$ nano mfo/nav.py
In it, create an instance of the Nav() class, named nav.
# mfo/home/nav.py

from flask_nav3 import Nav

nav = Nav()
You only want one instance of the Nav() class in your program. Creating it in a separate module lets you import it into the main application or into a blueprint file, while avoiding the problem of circular imports.
We also need to use Flask-Nav3's NavBar class to create a global_navbar instance that we can use as a base upon which blueprints will add their own navigation bar items. Register the global navigation bar with the nav instance under the name nav.main_navbar.
from flask_nav3.elements import Navbar, Text

global_navbar = Navbar(title=Text('MFO'))
nav.register_element('main_navbar', global_navbar)
Flask-Nav does not provide a built-in method to fetch a registered navbar object by name directly, so you can't add menu items just by manipulating the nav.main_navbar object.
To modify the global navigation bar, directly manipulate the global_navbar object you defined, then and then re-register it with the application's nav instance under the name main_nav.
Note: I registered the global_navbar instance as an element of the nav instance named main_navbar to make it clear that there are two separate objects in this case. It might be simpler to register the global navbar as a nav element using the same name so you alway know which navbar instance is associated with which navbar element.
Define a function that the application's blueprints will use to add their navigation bar items to the global navigation bar:
def add_to_global_nav(nav, local_navbar):
    for item in local_navbar.items:
        global_navbar.items.append(item)
    nav.register_element('main_navbar', global_navbar)
The function, above, adds the items from another navbar instance to the end of the global navbar instance. Then, it re-registers the new global navbar with the application's nav instance under the name main_navbar.
This setup avoids duplicating the global navbar and maintains a single navigation structure across the application. The nav.main_navbar object is used when rendering the navigation bar in a template.
The entire mfo/nav.py file will look like the listing below:
# mfo/home/nav.py

from flask_nav3 import Nav
from flask_nav3.elements import Navbar, Text


nav = Nav()

global_navbar = Navbar(title=Text('MFO'))
nav.register_element('main_navbar', global_navbar)

def add_to_global_nav(nav, local_navbar):
    for item in local_navbar.items:
        global_navbar.items.append(item)
    nav.register_element('main_navbar', global_navbar)
Register Flask-Nav3 with the app
To use Flask-Nav3 in your flask application, you need to initialize the nav instance you previously created in the nav.py module with your Flask application.
$ nano mfo/app.py
Import the nav module and then add the nav.init_app(app) method to the application, as shown below:
    # Register navbars
    mfo.nav.nav.init_app(app)
Be sure to initialize the nav instance before you register any blueprints that use it. The entire app.py file will look like below:
# mfo/app.py

import flask
from flask_security import Security

import mfo.home.views
import mfo.admin.views
import mfo.database.users as users
import mfo.database.commands
import mfo.database.base
import mfo.nav


def create_app():

    # Create app object
    app = flask.Flask(__name__)

    # Configure the app
    app.config.from_pyfile('config.py')

    # Register Flask-SQLAlchemy
    mfo.database.base.db.init_app(app)

    # Register Flask-Security-Too
    app.security = Security(app, users.user_datastore)

    # Register navbars
    mfo.nav.nav.init_app(app)

    # Register blueprints
    app.register_blueprint(mfo.home.views.bp)
    app.register_blueprint(mfo.admin.views.bp)
    app.register_blueprint(mfo.database.commands.bp)

    return app
Static navbars in blueprints
In this example, we assume that the navbars are static. They will not change due to any change in the state in the running application. So, we can use a simple method to define and register the navbars, and render them in a template.
The existing application already has two blueprint folders: home and admin. Create a navbar.py file in each blueprint folder. This file will describe the navigation bar object associated with each blueprint.
In the home blueprint folder, create the navbar.py file:
$ nano mfo/home/navbar.py
The navbar is simple, in this case, but could become more complex in the future or you might eventually define more than one navbar for the blueprint.
The contents of home blueprint's navbar.py file are:
# mfo/home/navbar.py

from flask_nav3.elements import Navbar, View, Link

home_navbar = Navbar(
    'Home Items',
    View('Home', 'home.index'),
    Link('Other', 'https://brianlinkletter.com')
)
The file, above, creates a navbar object which, in this case, is named "home_nav" and contains two items. It has a View item that will render the home page, and it has a Link item, added as an example, that will redirect you to another website.
Similarly, in the admin blueprint folder, create its navbar.py file:
$ nano mfo/admin/navbar.py
The contents of admin blueprint's navbar.py file are:
# mfo/admin/navbar.py

from flask_nav3.elements import Navbar, View, Link, Subgroup

admin_navbar = Navbar(
    'admin_items',
    View('Admin', 'admin.index'),
    Subgroup(
        'Links',
        Link('Test', 'https://brianlinkletter.com'),
        Link('Google', 'https://google.com'),
    )
)
Similar to the first blueprint, it contains a View item that renders the admin page and a Subgroup, created just as an example, that contains links to other web sites.
Register the navbars in the blueprint
To create a static navbar with blueprints, you simply create a function that appends the blueprint's menu items ito the global navbar and wrap it with the Flask Blueprint's record decorator. The record decorator registers the function with the blueprint so that it is called when the blueprint is registered by the application.
First, edit the views.py file in the home blueprint folder:
$ nano mfo/home/views.py
In the new function, get the main application's nav instance from the application's state object, which is made available to the function by the record decorator. Then, call the add_to_global_nav() function, which will iterate through the home blueprint's navbar object, add its items to the global navbar, and then re-register the global navbar with the application's nav instance.
Add the following code to the mfo/home/views.py module:
import mfo.nav
import mfo.home.navbar

@bp.record
def register_home_menu(state):
    nav = state.app.extensions['nav']
    mfo.nav.add_to_global_nav(nav, mfo.home.navbar.home_navbar)
The entire mfo/home/views.py module will look like below. Remember, you need to import the blueprint's navbar.py module and the main application's nav.py mpodule.
# mfo/home/views.py

import flask
import flask_security

import mfo.nav
import mfo.home.navbar

bp = flask.Blueprint(
    'home',
    __name__,
    static_folder='static',
    template_folder='templates',
    static_url_path='/home/static',
    url_prefix='/'
    )

@bp.record
def register_home_menu(state):
    nav = state.app.extensions['nav']
    mfo.nav.add_to_global_nav(nav, mfo.home.navbar.home_navbar)

@bp.route('/')
@flask_security.auth_required()
def index():
    return flask.render_template('/home/index.html')
Do the same with the admin blueprint. Edit the admin blueprint's views.py module:
$ nano mfo/admin/views.py
Add a decorated function that will add the admin blueprint's navbar items to the global navbar:
import mfo.nav
import mfo.admin.navbar

@bp.record
def register_admin_menu(state):
    nav = state.app.extensions['nav']
    mfo.nav.add_to_global_nav(nav, mfo.admin.navbar.admin_navbar)
The entire mfo/admin/views.py module will look like the following:
# mfo/admin/views.py

import flask
import flask_security
from werkzeug.exceptions import Forbidden

import mfo.nav
import mfo.admin.navbar


bp = flask.Blueprint(
    'admin',
    __name__,
    static_folder='static',
    template_folder='templates',
    url_prefix='/admin',
    )

@bp.record
def register_admin_menu(state):
    nav = state.app.extensions['nav']
    mfo.nav.add_to_global_nav(nav, mfo.admin.navbar.admin_navbar)

@bp.route('/')
@flask_security.auth_required()
@flask_security.roles_required('Admin')
def index():
    return flask.render_template('/admin/index.html')

@bp.errorhandler(Forbidden)
def handle_forbidden(e):
    return flask.render_template('forbidden.html', role="Admin")
Update the templates
To add the navigation menus to the web application, create a new template named navbar.html:
$ nano mfo/templates/navbar.html
Add the Flask-Nav3 render() method in the template:
<!-- mfo/templates/navbar.html -->

{{ nav.main_navbar.render() }}
Then, include the navbar.html template in the mfo/templates/base.html template:
$ nano mfo/templates/base.html
The new contents of the base.html template file will be:
<!-- mfo/templates/base.html -->

<!DOCTYPE html>
<html lang="en">
<head>
    <meta charset="UTF-8">
    <title>{% block title %}Example Website{% endblock %}</title>
    <link rel="stylesheet" href="/static/css/styles.css" />
    {% block additional_css %}{% endblock %}
</head>

<body>
    {% include "navbar.html" %}
    <div class="content">
        {% block content %}
        {% endblock %}
    </div>
</body>
</html>
Things to consider
In the main application, you need to initailize the Flask-Nav3 nav instance before any blueprints are registered so the nav instance will be available when the blueprints' record functions are executed.
In this program, the blueprints are registered only once. However, if you have a more complex application that registers the same blueprint more than once, you might consider using the record_once decorator instead of the record decorator. The record_once decorator ensures the decorated function is only called once, even if the blueprint is registered more than once.
Test the application
Test the new navigation menu created by Flask-Nav3.
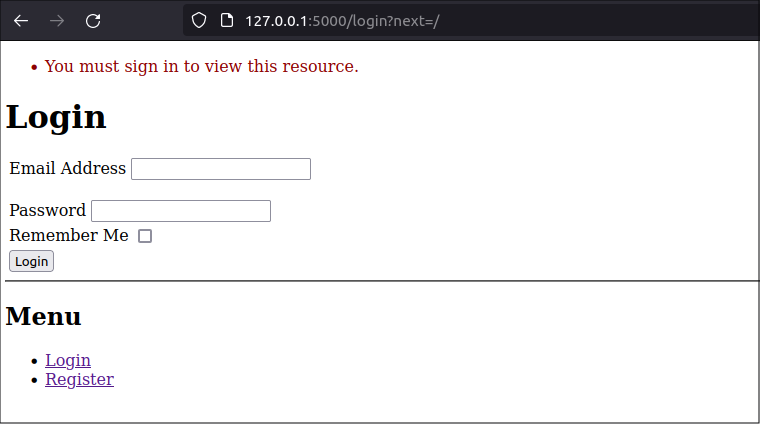
The application should still be running, so navigate your web browser to the URL: http://localhost:5000. You will see the login page created by the Flask-Security-Too Flask extension. The login page does not display a navigation menu because the security blueprint provided by the Flask-Security-Too package has not yet been customized to include it.
Login with userid [email protected] and password abcd1234.
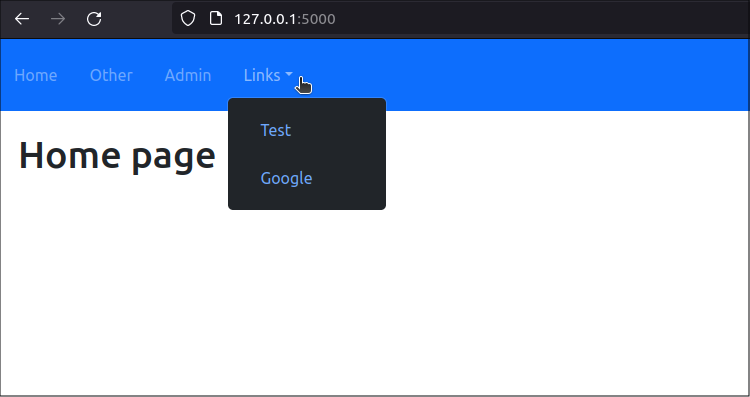
Then, you should see the home page and a menu with four main items and an indented list that represents the subgroup of links.
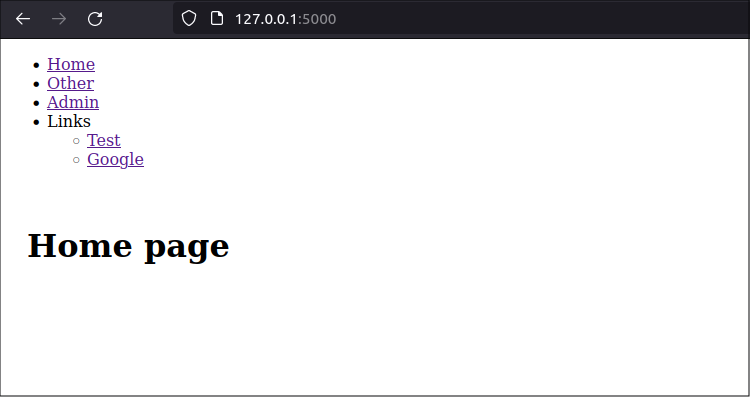
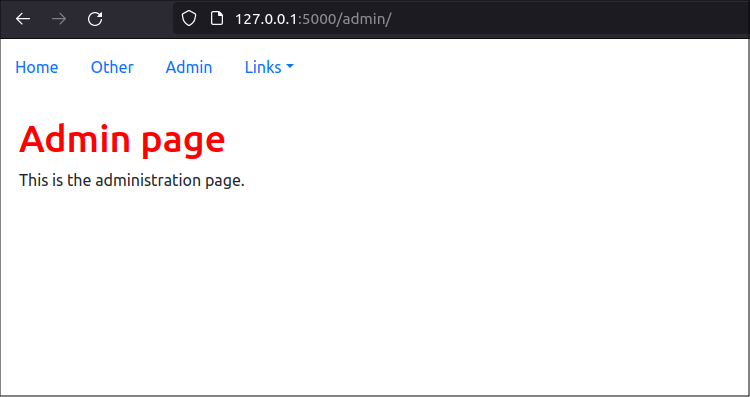
If you click on the Admin link in the navigation menu, you will open the admin page.

Next steps
You were able to create a navigation menu that is composed of separate navigation items from different blueprints. But, the menu looks ugly. If you look at the HTML code in the web page, you will see it is implemented as a simple unordered list with no styling, as shown below:
<nav class="navbar">
  <ul>
    <li>
      <a class="active" href="/" title="Home">Home</a>
    </li>
    <li>
      <a href="https://brianlinkletter.com">Other</a>
    </li>
    <li>
      <a href="/admin/" title="Admin">Admin</a>
    </li>
    <li>
      <div>
        <span>Links</span>
        <ul class="subgroup">
          <li>
            <a href="https://brianlinkletter.com">Test</a>
          </li>
          <li>
            <a href="https://google.com">Google</a>
          </li>
        </ul>
      </div>
    </li>
  </ul>
</nav>
In the next section, we will use a CSS framework to style the menu so it looks like a navigation bar at the top of the page.
Style the navigation bar with Bootstrap
The navigation menu can be styled to look like a navigation bar. You can use CSS, or any CSS framework, to style the Flask-Nav3 menu. In this case, we will use Bootstrap-Flask.
Install Bootstrap
First, set up the Bootstrap CSS framework in the application.
Install Boostrap-Flask. Edit the project's requirements.txt file:
$ nano requirements.txt
Add boostrap-flask to the file
# requirements.txt

flask
python-dotenv
Flask-Security-Too[fsqla,common]
Flask-Nav3
Bootstrap-Flask
Install the package using the following command:
$ pip install -r requirements.txt
Register Bootstrap in the application
The Bootstrap-Flask package simplifies the process of setting up Bootstrap in your application. Simply import the Bootstrap5 class from the package and call it.
Edit the main application file:
$ nano mfo/app.py
In the file, import the Bootstrap5 class from the flask_bootstrap package:
from flask_bootstrap import Bootstrap5
Bootstrap5 is a class that will integrate Bootstrap version 5 into a Flask application. Call it, and tell it application's name, This will register the Bootstrap-Flask extension with the Flask application:
bootstrap = Bootstrap5()
bootstrap.init_app(app)
The full mfo/app.py file will look like below:
# mfo/app.py

import flask
from flask_security import Security
from flask_bootstrap import Bootstrap5

import mfo.home.views
import mfo.admin.views
import mfo.database.users as users
import mfo.database.commands
import mfo.database.base as base
import mfo.nav


def create_app():

    # Create app object
    app = flask.Flask(__name__)

    # Configure the app
    app.config.from_pyfile('config.py')

    # Register Bootstrap
    bootstrap = Bootstrap5()
    bootstrap.init_app(app)

    # Register Flask-SQLAlchemy
    base.db.init_app(app)

    # Register Flask-Security-Too
    app.security = Security(app, users.user_datastore)

    # Register navbars
    mfo.nav.nav.init_app(app)

    # Register blueprints
    app.register_blueprint(mfo.home.views.bp)
    app.register_blueprint(mfo.admin.views.bp)
    app.register_blueprint(mfo.database.commands.bp)

    return app
Include Bootstrap in the base template
Bootstrap-Flask automatically creates a context processor that injects the bootstrap object into the template's context. You can invoke the bootstrap.load_css() and bootstrap.load_js() helper functions as methods in the header and at the end of the body, respectively, in the base template. You should also add metadata that defines the viewport, as recommended in the Bootstrap-Flask documentation.
<!-- mfo/templates/base.html -->

<!DOCTYPE html>
<html lang="en">
<head>
    <meta charset="UTF-8">
    <meta name="viewport" content="width=device-width, initial-scale=1.0">
    <title>{% block title %}Example Website{% endblock %}</title>
    <link rel="stylesheet" href="/static/css/styles.css" />
    {{ bootstrap.load_css() }}
    {% block additional_css %}{% endblock %}
</head>

<body>
    {% include "navbar.html" %}
    <div class="content">
        {% block content %}
        {% endblock %}
    </div>
    {{ bootstrap.load_js() }}
</body>
</html>
Finally, edit the navbar.html template.
$ nano mfo/templates/navbar.html
To style the nav items, tell the Flask-Nav3 render method to use the bootstrap5 renderer.
<!-- mfo/templates/navbar.html -->

{{ nav.main_navbar.render(renderer='bootstrap5') }}
Test the application
The application should still be running. Refresh the web browser to see the new styling. You should see that the home page has a nice navbar at the top and that the last link displays a dropdown menu when you click on it:
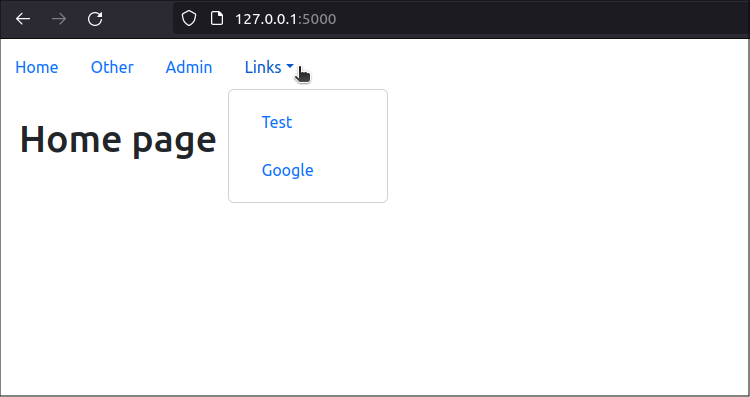
If you click on the Admin link, the app displays the admin page:
If you look at the HTML code generated by the web page, you will see that the navbar has been styled using Bootstrap5 classes:
  <nav class="navbar navbar-expand-lg">
    <ul class="nav">
      <li class="nav-item">
        <a class="nav-link active" href="/" title="Home">Home</a>
      </li>
      <li class="nav-item">
        <a class="nav-link" href="https://brianlinkletter.com">Other</a>
      </li>
      <li class="nav-item">
        <a class="nav-link" href="/admin/" title="Admin">Admin</a>
      </li>
      <li class="nav-item">
        <div class="dropdown">
          <a class="nav-link dropdown-toggle" data-bs-toggle="dropdown" href="#">Links</a>
          <ul class="dropdown-menu">
            <li class="dropdown-item">
              <a class="nav-link" href="https://brianlinkletter.com">Test</a>
            </li>
            <li class="dropdown-item">
              <a class="nav-link" href="https://google.com">Google</a>
            </li>
          </ul>
        </div>
      </li>
    </ul>
  </nav>
Additional navbar classes
You can add keyword arguments to the render method when you call it in the template. These arguments will be added to the main <nav> tag in the resulting HTML.
For example, to make the navbar a dark blue color and to use dark mode styling (which automatically makes the text lighter than the navbar background) modify the navbar.html template as shown below:
<!-- mfo/templates/navbar.html -->

{{ nav.main_navbar.render(renderer='bootstrap5', **{'class': 'navbar-dark bg-primary'}) }}
This will result in a navbar that looks like the screenshot below:
The extra classes, and other keyword arguments, will be applied to the <nav> tag in the HTML output.
Custom renderers
If you want to control attributes like spacing between nav links, justification, highlighting the active item, and more, you must explore creating a custom renderer.
To create a custom renderer, I suggest you copy and modify the code from the Bootstrap-Flask BootStrap5Renderer class. You may also look at the old BootStrapRender class in the defunct Flask-Bootstrap project for additional inspiration.
Write a new class that overrides the functions you need to override. Then define that class as a new renderer and use it in your template.
Making a dynamic navbar?
If, like me, you want to separate as much business logic as possible into re-usable Flask blueprints, including logic that defines the navbar, you will find it is too complex to create a global navbar that is dynamic.
I tried creating blueprint functions that updated their portion of the global navbar based on the application state. But, I found that I had to keep track of global objects that reduced the independence of the blueprints. I decided that it was not worth the complexity to create a dynamic global navbar based on blueprints. It is much simpler to have one central function that builds the global navbar, running in the main application context.
But, if you only need a static navbar, then it is still possible to separate the navbar definition into each blueprint.
Conclusion
I showed how you can use the Flask-Nav3 library to build a static navigation bar taht builds its items based on each blueprint in your project, and I showed how to style the menu items using a Jinja2 template.