Create a database command-line utility
Posted on Thu 09 November 2023 in Python
I created a simple command-line-interface utility that modifies data in a database. It can add, read, or delete data. I created the program to practice working with databases in Python programs. While doing this I also learned how to use Python libraries to build CLI programs.
My goals were to:
- Write a "real program" using the packaging concepts I learned over the past few weeks
- Excercise more relational database concepts, like relationships between tables
- Learn to manage SQLAlchemy sessions in different types of programs
- Learn one of the Python CLI libraries
This post assumes the reader is familiar with SQLAlchemy basics. If you are new to the topic of SQLAlchemy, I suggest you review some of my previous posts about the basic features of SQLAlchemy, how SQLAlchemy represents data in a Python program, and how to declare SQLAlchemy ORM mapped classes.
Project files and folders
First, I created a project folder that contains the project's metadata, the program source code, test code, and documentation. A good project structure supports packaging the program for distribution and makes testing the program more realistic.
I created the project directory structure shown below:
dbproject/
   ├── .gitignore
   ├── requirements.txt
   ├── README.md
   ├── LICENCE.txt
   ├── src
   │   └── dbapp/
   │       ├── database/
   │       │   ├── connect.py
   │       │   ├── functions.py
   │       │   ├── models.py
   │       │   └── __init__.py
   │       ├── interface/
   │       │   ├── cli.py
   │       │   └── __init__.py
   │       ├── config.py
   │       ├── .env
   │       ├── __init__.py
   │       └── __main__.py
   ├── docs/
   │   └── dotenv_example.txt
   └── tests/
       └── test.py
The project folder
The files are in a directory named dbproject. I could have chosen any name for the project directory because the actual name used to run the program is set in the program's package sub-directory, not the project directory.
When using source control, I prefer the project directory name to be the same as the source control remote repository name. If I were to publish this on GitHub, I would call the repository "dbproject".
The project metadata is in the root level of the dbproject directory. I created all the files necessary for packaging, which includes a README.md file, a license file, Git files (if using source control), and a requirements.txt file. I organized the rest of the project into three sub-directories named src, docs, and tests.
The docs directory
The docs directory contains a dotenv_example.txt file because the real dotenv file must be excluded from source control, using the .gitignore file, so I like to document an example for anyone who clones one of my projects from GitHub.
The tests directory
The tests directory contains one program named test.py. I am not proficient in writing real tests yet so it is just an empty file. In the future, I will write more complex test modules and store them in this directory.
The src directory
The src directory contains the program's source code. Using a directory like src instead of just starting with the application package directory is recommended by the Python Packaging Authority and others1.
The dbapp package
The program I wrote is called dbapp. So, I organized the application source code in the src directory in a package directory named dbapp. The dbapp package contains the following:
- A file named __init__.py. The presence of this file tells Python that its directory is a package directory and is to be treated as a regular Python package. It is often left blank but any code in it will run when a Python module imports the package.
- A file named __main__.py, which is the program entry point. Python automatically runs __main__.py when a user runs the
python -m dbappcommand while in the dbproject/src directory. - A configuration module named config.py
- A dotenv file named .env for safely storing sensitive database connection strings and other secrets. It must be excluded from source control.
- Two sub-packages named database and interface, that contain the program's other modules
The database sub-package
The database sub-package contains four modules:
- __init__.py, which is blank
- connect.py sets up the database connection
- models.py contains the SQLAlchemy code that defines the database. An abstract representation of a database table is called a model so many developers call the module that contains database table classes models.py.
- functions.py creates functions that read, write, and delete database information
The interface sub-package
The interface sub-package contains three modules:
- __init__.py, which is blank
- cli.py runs the program's command-line interface
- functions.py creates functions that support interacting with the user
Set up the environment
Before I started writing code, I set up my programming environment. I created a Python virtual environment so I could install the dependencies and test my code. I also created a database server so I could test my database code.
Python virtual environment
As usual, I created a Python virtual environment and activated it:
$ mkdir dbproject
$ cd dbproject
$ python3 -m venv .venv
$ source .venv/bin/activate
(.venv) $
Install dependencies
In the requirements.txt file, I recorded the libraries that need to be installed so my program will work:
# dbproject/requirements.txt
SQLAlchemy
psycopg2
python-dotenv
Then, I used the requirements.txt file to install the project dependencies.
(.venv) $ pip install -r requirements.txt
Define database variables
I set up a PostgreSQL database server so I could test my program. In production, a database administrator would usually assign a database server and provide to a developer its userid and password. During development, I created my own local server so I am in control of its configuration.
I decided that my database information would be as follows:
- Database name = userdata
- Admin user = userdata
- Admin password = abcd1234
- TCP port: 5432
Since the database server will run on a Docker container on my local machine, its connection information will be:
- Server address: localhost
Create the dotenv file
I created a dotenv file named .env that was used to load these configurations into variables in the config.py module. Some of these variables will also be used by the Docker run command2 when I create my database container.
I created the file in the src/dbapp directory (the current working directory is dbproject).
(.venv) $ mkir -p src/dbapp
(.venv) $ cd src/dbapp
(.venv) $ nano .env
I entered the following variables in the file and then saved it:
# dbproject/src/dbapp/.env
DB_SERVER_ADDRESS=localhost
DB_SERVER_TCP_PORT=5432
POSTGRES_DB=userdata
POSTGRES_USER=userdata
POSTGRES_PASSWORD=abcd1234
Create the database server
I used Docker to create a new database container called ps_userdata. I started a container running PostgreSQL using the official PostgreSQL docker image from Docker Hub.
I ran the following command to start the server (the current working directory is dbproject/src/dbapp):
(.venv) $ docker run \
    --detach \
    --env-file ./.env \
    --publish 5432:5432 \
    --name postgres_db\
    postgres:alpine
I tested that the server was running by logging into it:
(.venv) $ docker exec -it postgres_db psql \
    --username userdata \
    --dbname userdata \
    --password
After entering the password, I saw the psql prompt and checked that the database was empty. Then, I quit the psql application:
userdata=# \d
Did not find any relations.
userdata=# quit
(.venv) $
Ready to start
Now the development environment is ready. I have a Python virtual environment with my dependencies installed, and a database server ready to use. I also have a dotenv file from which my Python configuration module can can get the database connection information.
Program configuration
It is good practice to place all configuration code in one module (or, if multiple configurations are needed, then place them all in one package)3 and then import information from that module when needed.
There are multiple ways to store configuration settings. I am using one of the simpler schemes.
The configuration file
I created a module called config.py in the dbapp package directory. It builds the database configuration string from environment variables that are expected to be configured on the system where the application is installed, or made available in a dotenv file in the package directory.
# dbproject/src/dbapp/config.py
import os

from sqlalchemy.engine import URL
from dotenv import load_dotenv

load_dotenv()  # get environment variables from system or from dotenv file

_database_server = os.getenv('DB_SERVER_ADDRESS')
_database_port = os.getenv('DB_SERVER_TCP_PORT')
_database_name = os.getenv('POSTGRES_DB')
_database_userid = os.getenv('POSTGRES_USER')
_database_password = os.getenv('POSTGRES_PASSWORD')

database_url = URL.create(
    drivername='postgresql+psycopg2',
    username=_database_userid,
    password=_database_password,
    host=_database_server,
    port=_database_port,
    database=_database_name
    )

if __name__ == "__main__":
    print(f"Database URL = {database_url}")
To test the module, I ran it as a module:
(.venv) $ python -m config
Database URL = postgresql+psycopg2://userdata:***@localhost:5432/userdata
Database code
Before I wrote the __main__.py module in the dbapp package, I wrote all the other program modules and tested them, one by one. Then, I wrote the __main__.py module, which simply imports and runs the other modules.
First, I wrote the modules that interface with the database.
Database sub-package
I used the following shell commands to create the database sub-package:
(.venv) $ mkdir database
(.venv) $ cd database
(.venv) $ touch __init__.py
Then, I created the database modules, connect.py, models.py, and functions.py.
Database connection module
I set up the database connection in the connect.py module, as shown below.
# dbproject/src/dbapp/database/connect.py

from sqlalchemy import create_engine
from sqlalchemy.orm import sessionmaker

from dbapp import config


engine = create_engine(config.database_url)
Session = sessionmaker(engine)


if __name__ == "__main__":
    print(engine)
    with Session() as session:
        connection = session.connection()
        print(connection)
The module defines the engine object and creates the Session object that will be used in the other modules to create database sessions.
I chose to use SQLAlchemy's sessionmaker() function so that the Session object created would include automatic connection management when other modules use it as a context manager.
To test the module, I ran it as a module. Because the connect.py module imports the config.py module from the dbapp package, I needed to run this module from the dbproject/src directory:
(.venv) $ cd ../..
(.venv) $ python -m dbapp.database.connect
The session.connection() function in the test code forces the session to start a transaction, which makes it try to immediately connect to the database. If the SQLAlchemy session failed to connect to the database, it would have raised an exception. The output shown below shows that the database connection was successful.
Engine(postgresql+psycopg2://userdata:***@localhost:5432/userdata)
<sqlalchemy.engine.base.Connection object at 0x7fd4c9015f00>
Then, I went back to the database sub-package directory so I can continue adding modules there.
(.venv) $ cd dbapp/database
Create database models
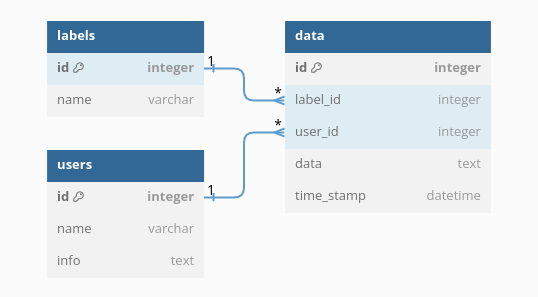
To define the database tables, I used ORM mapped classes that are usually called models. In the models.py module, I created three tables that have relationships between them:
- The users table contains user information. Each user may have many data items so this table has a one to many relationship with the storage table.
- The labels table contains valid data label names. Each data label may be associated with many data entries so this forms a one to many relationship with the storage table.
- The storage table contains data for each user and label. Each data item is associated with only one user and each user may have more than one data item in the table. Each data item has a label that identifies its type or purpose.
I found it was very helpful to create a diagram of the tables that shows the columns and relationships. I used the database modeling web application at https://dbdiagram.io/ to create the diagram, below:
The declarative base
I used the SQLAlchemy declarative mapping method to define the tables and relationships.
I walk through each section of the models.py module, in order, below.
First, I imported the necessary SQLAlchemy classes and functions and created the Base class that support the declarative mapping of database tables to classes.
# dbproject/src/dbapp/database/models.py

from sqlalchemy import Integer, String, UnicodeText, DateTime
from sqlalchemy import ForeignKey
from sqlalchemy import func
from sqlalchemy.orm import DeclarativeBase
from sqlalchemy.orm import mapped_column


class Base(DeclarativeBase):
    pass
The users and labels tables
In a star schema like the one I am using for this application, tables like the users and labels tables are called dimension tables. They contain details about the characteristics of the data in the fact table.
The users table has three columns:
- The id column that will serve as its primary key. Each User ID will be an integer.
- The name column contains a string meant to contain a user's name. It also sets its nullable attribute to False because the user must have a name and its name cannot have a value of None or NULL.
- The info column contains a user's information. It is here just as a demonstration and is not critical to the program. In a more realistic scenario, I can imagine that a users table might contain many columns that describe the different attributes of each user.
The Users class defines the users table as shown below:
class User(Base):
    __tablename__ = "users"
    id = mapped_column(Integer, primary_key=True)
    name = mapped_column(String(64), unique=True, nullable=False)
    info = mapped_column(UnicodeText)
The labels table has two columns:
- The id column identifies the label and is the table's primary key
- The label column is the name of the label. It also sets its nullable attribute to False because the label must have a name and cannot have a value of None or NULL.
class Label(Base):
    __tablename__ = "labels"
    id = mapped_column(Integer, primary_key=True)
    name = mapped_column(String(32), unique=True, nullable=False)
The storage table
In this schema, the storage table acts as the fact table. It contains the data we are interested in and refers to the dimension tables for additional details. The storage table has five columns:
- The data_id column uniquely identifies the data item and serves as the storage table's primary key.
- The user_id column identifies the user associated with this data and has a foreign key relationship with the id column in the users table. It creates a one-to-many relationship with the user table. It also sets its nullable attribute to False because every row must be related to a user via the user_id. If I make a mistake in my program that allows a value of None in this field, SQLAlchemy will raise an error.
- The label_id column identifies the label associated with this data and has a foreign key relationship with the id column in the labels table. It creates a one-to-many relationship with the labels table. It also sets its nullable attribute to False because every row must be related to a label via the label_id.
- The data_item column contains the user's data. In this simple example, it will be a unicode text field that may contain any size of unicode data. It could be any readable text, from a short message to a novel.
- The time_stamp column shows when the data was created, or when it was last updated. This column runs an SQL function on the database server to generate the time stamps.
class Storage(Base):
    __tablename__ = "storage"
    # columns
    id = mapped_column(Integer, primary_key=True)
    user_id = mapped_column(ForeignKey("users.id"), nullable=False)
    label_id = mapped_column(ForeignKey("labels.id"), nullable=False)
    data_item = mapped_column(UnicodeText)
    time_stamp = mapped_column(DateTime(), default=func.now(), onupdate=func.now())
The db_setup() function
The db_setup() function creates the database if it does not yet exist on the connected database server. If the database already exists, it makes no changes to it, so it is safe to run every time the program runs.
def db_setup(engine):
    Base.metadata.create_all(engine)
Test code
The test code, which runs when this module is executed as a script, simply tries to create the database using the Base object's metadata that was created by each ORM mapped class in the models.py file. It will echo the SQL commands generated by SQLAlchemy onto the terminal screen.
If I had made any syntax errors in the table definitions of relationships, or declared something that SQLAlchemy does not allow, the test code will raise an exception.
if __name__ == "__main__":
    from dbapp.database.connect import engine
    engine.echo = True
    db_setup(engine)
I ran the module from the dbroject/src directory to see if any errors were raised. It appeared that all worked correctly.
(.venv) $ cd ../..
(.venv) $ python -m dbapp.database.models
The engine.echo attribute causes SQLAlchemy to print out the SQL commands it generates. I saw the SQL commands that check for existing tables and set up the schema. Then, SQLAlchemy printed the SQL commands that created the new tables, as shown below:
2023-11-04 23:27:51,160 INFO sqlalchemy.engine.Engine
CREATE TABLE users (
        id SERIAL NOT NULL,
        name VARCHAR(64) NOT NULL,
        info TEXT,
        PRIMARY KEY (id),
        UNIQUE (name)
)

2023-11-04 23:27:51,161 INFO sqlalchemy.engine.Engine [no key 0.00054s] {}
2023-11-04 23:27:51,194 INFO sqlalchemy.engine.Engine
CREATE TABLE labels (
        id SERIAL NOT NULL,
        name VARCHAR(32) NOT NULL,
        PRIMARY KEY (id),
        UNIQUE (name)
)

2023-11-04 23:27:51,194 INFO sqlalchemy.engine.Engine [no key 0.00025s] {}
2023-11-04 23:27:51,206 INFO sqlalchemy.engine.Engine
CREATE TABLE storage (
        id SERIAL NOT NULL,
        user_id INTEGER NOT NULL,
        label_id INTEGER NOT NULL,
        data_item TEXT,
        time_stamp TIMESTAMP WITHOUT TIME ZONE,
        PRIMARY KEY (id),
        FOREIGN KEY(user_id) REFERENCES users (id),
        FOREIGN KEY(label_id) REFERENCES labels (id)
)


2023-11-04 23:27:51,206 INFO sqlalchemy.engine.Engine [no key 0.00017s] {}
2023-11-04 23:27:51,220 INFO sqlalchemy.engine.Engine COMMIT
When working with an empty database, the test code results in the SQL commands seen above. When working with existing tables, the test code results in no SQL CREATE TABLE commands because SQLAlchemy detects that the tables already exist and that they match the tables defines in the classes in the models.py module.
Create database functions
I decided to create a module that contains all the functions that operate on the database. My plan was to import functions from this module when other modules need to add data to a database session, read data from the database, and delete data.
All these functions will interact with the SQLAchemy ORM session. So, at this point, I needed to decide where in the program I should create the database session, or if I should create multiple sessions.
The SQLAlchemy ORM documentation recommends that CLI utilities create one session for the entire program, and import it into any other modules that use it. So, the functions in the database/functions.py module will accept the session object as a parameter and the module in which they are used will import the session object from the __main__.py module in the dbapp package directory.
I created the functions.py module in the dbproject/scr/dbapp/database directory:
(.venv) $ cd dbapp/database
(.venv) $ nano modules.py
First, I imported the functions I needed from the Python standard library and from SQLAlchemy. Then, I imported the database models I created in models.py.
# dbproject/src/dbapp/database/functions.py

from sqlalchemy import select, delete, func

from dbapp.database.models import Storage, User, Label
The data_write() function
The data_write function writes user data to the database. If the user does not already exist in the users table, the function will add the user name in the users table and then add the data in the storage table. The same happens for the label: if the label does not already exist in the labels table, the function adds it there before adding the data.
def data_write(session, user_name, label_name, data_item):

    # if user exists, get user from database
    user = session.scalar(select(User).where(User.name == user_name))
    # if user does not exist, create new user in database
    if user == None:
        user = User(name=user_name)
        session.add(user)
        session.flush()  # create user.id

    # if label exists, get label from database
    label = session.scalar(select(Label).where(Label.name == label_name))
    # if label does not exist, create new label in database
    if label == None:
        label = Label(name=label_name)
        session.add(label)
        session.flush()  # create label.id

    # Add data item
    data = Storage(label_id=label.id, user_id=user.id, data_item=data_item)
    session.add(data)

    print(f"User '{user.name}' added data labeled '{label.name}'.")
In the function's first stanza, I check to see if the contents of the user_name parameter matches the name of any user in the users table. If so, I get that User instance from the database. If not, I create a new User instance, which will add a new row to the users table when added to the session. In that case, I also flush the session so that the database will automatically populate the table's id column with a valid key and return that key to the session so it can be used later in the function.
In the function's second stanza, I do the same with the label_name parameter.
And, finally, I create a Storage instance and add it to the session. This will result in a new row in the storage table that has the user ID, label ID, and the data. The timestamp column and the storage ID column will get automatically populated by the database when the session is committed.
The data_read() function
The data_read() function reads user data from the database. the function needs both a user_name and a Label_name to find the one or more rows that have the matching user ID and label ID.
If the user_name and label_name exist in the database, the function selects joins the information in the users and labels tables with the storage table and returns all rows where both the user_id and label_id columns from the storage table matches the user ID and label ID associated with the user_name and label_name.
If no results are returned, even though the user_name and label_name were valid, then that means that the user is not using that label for any of their data.
The data_read() function is shown below:
def data_read(session, user_name, label_name):

    user = session.scalar(select(User).where(User.name == user_name))
    if user == None:
        print(f"User '{user_name}' does not exist.")
        return

    label = session.scalar(select(Label).where(Label.name == label_name))
    if label == None:
        print(f"Label '{label_name}' does not exist.")
        return

    stmt = (
        select(Storage.data_item.label("data"),
            User.name.label("user_name"),
            Label.name.label("label_name"))
        .join(Label)
        .join(User)
        .where(Label.id==label.id)
        .where(User.id==user.id)
    )
    result = session.execute(stmt).fetchall()
    if len(result) > 0:
        for row in result:
            print(
                f"User: {row.user_name},  "
                f"Label: {row.label_name},  "
                f"Data: {row.data},  "
                f"Time: {row.time_stamp}"
                )
    else:
        print(f"User '{user_name}' does not use label '{label_name}.")
Why use the select() function?
Many SQLAlchemy blog posts and tutorials use the SQLAlchemy ORM's query() function to read data from a database. However, since version 2.0 of SQLAlchemy, the query() function is considered to be a legacy tool. It still works, for now, but has been replaced by a new recommended function: the select() function.
I am using the select() function because it is the recommended way to get data from the SQLAlchemy ORM and I want to focus on using SQLAlchemy in the most "modern" way.
The data_delete() function
The data_delete() function deletes user data from the database. After deleting the rows that match both the user_name and label_name, the function checks if the label and/or the user are still have data associated with them in the storage table. If not, the leftover label or user is deleted from the labels or users table.
This function uses the new SQLAlchemy ORM delete() function to perform a bulk-delete of storage table rows that match both the user ID and the label ID.
def data_delete(session, user_name, label_name):

    # Get user record, or quit if user does not exist in "users" table
    user = session.scalar(select(User).where(User.name == user_name))
    if user == None:
        print(f"User '{user_name}' does not exist.")
        return

    # Get label record, or quit if label does not exist in "labels" table
    label = session.scalar(select(Label).where(Label.name == label_name))
    if label == None:
        print(f"Label '{label_name}' does not exist.")
        return

    # Check if any records match both the user ID and the label ID
    stmt = (
        select(func.count())
        .select_from(Storage)
        .join(Label)
        .join(User)
        .where(Label.id == label.id)
        .where(User.id == user.id)
    )
    number_matched = session.execute(stmt).scalar()
    if number_matched == 0:
        print(f"User '{user_name}' does not use Label '{label_name}'.")
        return

    # Bulk delete all records that match both the user ID and the label ID
    stmt = (
        delete(Storage)
        .where(Storage.user_id == user.id)
        .where(Storage.label_id == label.id)
    )
    session.execute(stmt)
    print(f"Deleted {number_matched} rows.")

    # If label is no longer used in the "storage" table,
    # then also delete it from the "labels" table
    stmt = select(Storage.id).where(Storage.label_id == label.id).limit(1)
    label_exists = session.scalar(stmt)
    if label_exists == None:
        session.delete(label)

    # If user is no longer used in the "storage" table,
    # then also delete them from the "users" table
    stmt = select(Storage.id).where(Storage.user_id == user.id).limit(1)
    user_exists = session.scalar(stmt)
    if user_exists == None:
        session.delete(user)
The user_read() function
The user_read() function simply lists all user names in the users table.
def user_read(session):
    stmt = (select(User.name))
    user_list = session.scalars(stmt).all()
    for x in user_list:
        print(x)
The label_read() function
The label_read() function lists all labels used by a particular user. This helps find data items one may want to read, using the data_read() function.
def label_read(session, user_name):
    user = session.scalar(select(User).where(User.name == user_name))
    if user == None:
        print(f"User '{user_name}' does not exist!")
    else:
        stmt = (select(Label.name).distinct()
                .join(Storage)
                .join(User)
                .where(User.id == user.id)
        )
        label_list = session.scalars(stmt).all()
        for x in label_list:
            print(x)
The test code
At the end of the functions.py module, I created some test code which will create an empty database, then add, read, and delete information.
if __name__ == "__main__":

    from dbapp.database.connect import Session
    from dbapp.database.connect import engine
    from dbapp.database.models import Base
    from sqlalchemy import select

    Base.metadata.drop_all(engine)
    Base.metadata.create_all(engine)

    session = Session()

    data_write(session, user_name="Bill",label_name="Notes",data_item="makes some notes")
    data_write(session, user_name="Jane",label_name="reports",data_item="I would like to report that...")
    data_write(session, user_name="Bill",label_name="directions",data_item="Go west")
    data_write(session, user_name="Jane",label_name="directions",data_item="Go north then east")
    data_write(session, user_name="Jane",label_name="description",data_item="tall and dark")
    data_write(session, user_name="Jane",label_name="reports",data_item="more reports data")
    data_write(session, user_name="Brian",label_name="reports",data_item="Brian reports...")
    data_write(session, user_name="Walter",label_name="www",data_item="Walter web data...")
    session.commit()
    print()
    data_read(session, user_name="Jane", label_name="zed")
    data_read(session, user_name="Noone", label_name="reports")
    data_read(session, user_name="Jane", label_name="www")
    data_read(session, user_name="Jane", label_name="reports")
    print()
    user_read(session)
    print()
    label_read(session, user_name="Jane")
    session.commit()
    print()
    data_delete(session, user_name="Bill", label_name="reports")
    data_delete(session, user_name="Brian", label_name="reports")
    data_delete(session, user_name="Jane", label_name="reports")
    session.commit()

    session.close()
To test my code, I run the functions.py module as a script:
(.venv) $ cd ../..
(.venv) $ python -m dbapp.database.functions
I saw the following output:
User 'Bill' added data labeled 'Notes'.
User 'Jane' added data labeled 'reports'.
User 'Bill' added data labeled 'directions'.
User 'Jane' added data labeled 'directions'.
User 'Jane' added data labeled 'description'.
User 'Jane' added data labeled 'reports'.
User 'Brian' added data labeled 'reports'.
User 'Walter' added data labeled 'www'.

Label 'zed' does not exist.
User 'Noone' does not exist.
User 'Jane' does not use label 'www.
User: Jane,  Label: reports,  Data: I would like to report that...,  Time: 2023-11-06 14:02:12.044012
User: Jane,  Label: reports,  Data: more reports data,  Time: 2023-11-06 14:02:12.044012

Bill
Jane
Brian
Walter

description
directions
reports

User 'Bill' does not use Label 'reports'.
Deleted 1 rows.
Deleted 2 rows.
I used the psql program on the postgres database container to see the results of the database commands. First I execute the command on the container:
(.venv) $ docker exec -it postgres_db psql --username userdata --dbname userdata
Then I read the data in the three tables:
userdata=# select * from users;
 id |  name  | info
----+--------+------
  1 | Bill   |
  2 | Jane   |
  4 | Walter |
(3 rows)

userdata=# select * from labels;
 id |    name
----+-------------
  1 | Notes
  3 | directions
  4 | description
  5 | www
(4 rows)

userdata=# select * from storage;
 id | user_id | label_id |     data_item      |         time_stamp
----+---------+----------+--------------------+----------------------------
  1 |       1 |        1 | makes some notes   | 2023-11-06 00:00:33.389959
  3 |       1 |        3 | Go west            | 2023-11-06 00:00:33.389959
  4 |       2 |        3 | Go north then east | 2023-11-06 00:00:33.389959
  5 |       2 |        4 | tall and dark      | 2023-11-06 00:00:33.389959
  8 |       4 |        5 | Walter web data... | 2023-11-06 00:00:33.389959
(5 rows)

userdata=# quit
$
The user interface
At this point I have defined a database and created a set of functions that can manipulate data in the database. Now, I need to create a user interface so the program can be used.
I decided to create a command-line interface. I chose to use the Python Standard Library's argparse module because it is the "standard" CLI module for Python and I wanted to learn the basics before I tried other Python CLI libraries. Other popular libraries that help programmers build command-line interfaces are: Click, DocOpt, and Typer.
In the interface sub-package, I created the cli.py module:
(.venv) $ cd dbapp/interface
(.venv) $ nano cli.py
The interface is simple. I each database function I created in the database/functions.py module will correspond with a CLI sub-command. For example, the dbapp.database.functions.data_read() function will correspond to a command like dbapp read <user> <label>.
Define CLI interface
The first section in the cli.py module imports the argparse and dbapp.database.functions modules and documents the user interface. I found it useful to write a docstring that would be similar to what should be output by the command when the user requests help. This helped me understand the sub-commands I would create and the parameters required by each sub-command.
# dbapp/interface/cli.py

import argparse

import dbapp.database.functions as f

"""Database Application.

Usage:
  dbapp.py write USER LABEL DATA
  dbapp.py delete USER LABEL
  dbapp.py read USER LABEL
  dbapp.py read_users
  dbapp.py read_labels USER
  dbapp.py -h | --help
  dbapp.py -v | --version

Options:
  -h --help         Show this help message and exit
  --version         Show program version and exit
"""
The create_parser() function
The create_parser() function builds the scafolding for the CLI and returns the argparse parser object to the program.
The argparse documentation and tutorial are well-written so I won't re-create an explanation of how to create an argparse parser in this post.
Basically, I created a parser for each "command", like dbapp, and a sub-parser for each of the command's "sub-commands", like write or read_users. Then I added help text to each command or sub-command and define arguments expected. This all helps that argparse library to manage the CLI and to print out context-appropriate help messages when requested.
def create_parser():
    parser = argparse.ArgumentParser(
        description="Database Application"
        )
    subparsers = parser.add_subparsers(
        title='subcommands',
        dest='subparser_name'
        )

    read_parser = subparsers.add_parser(
        'read',
        aliases=['r'],
        help="Display rows that match name and label."
        )
    read_parser.add_argument('user_id')
    read_parser.add_argument('label_id')

    read_users_parser = subparsers.add_parser(
        'read_users',
        aliases=['u'],
        help="Display all users in the database."
        )

    read_labels_parser = subparsers.add_parser(
        'read_labels',
        aliases=['l'],
        help="Display labels used by a user."
        )
    read_labels_parser.add_argument('user_id')

    write_parser = subparsers.add_parser(
        'write',
        aliases=['w'],
        help="Add new data. Enter user name, label, and data.")
    write_parser.add_argument('user_id')
    write_parser.add_argument('label_id')
    write_parser.add_argument('user_data')

    delete_parser = subparsers.add_parser(
        'delete',
        aliases=['d', 'del'],
        help="Delete rows that matche name and label.")
    delete_parser.add_argument('user_id')
    delete_parser.add_argument('label_id')

    parser.add_argument(
        '-v', '--version',
        action='version',
        version='dbapp 0.1')

    return parser
I liked using argparse. It let me design the command line interface one piece at a time. Looking through the code in the create_parser() function, I can see how each command is expected to work.
The cli() function
The cli() function provides the main logic for the cli-based program. It creates the parsers, then it gets the arguments that have been entered at the command-line interface.
The cli() function checks which sub-parser is in use, or which sub-command has been entered by the user. Then, it gets the arguments associated with that sub-command and calls the appriopriate database function.
def cli():

    db_setup(engine)

    parser = create_parser()
    args = parser.parse_args()

    with Session.begin() as session:
        match args.subparser_name:
            case 'read' | 'r':
                f.data_read(session, args.user_id, args.label_id)
            case 'read_users' | 'u':
                f.user_read(session)
            case 'read_labels' | 'l':
                f.label_read(session, args.user_id)
            case 'write' | 'w':
                f.data_write(session, args.user_id, args.label_id, args.user_data)
            case 'delete' | 'del' | 'd':
                f.data_delete(session, args.user_id, args.label_id)
            case None if not args.interactive:
                parser.print_help()
The test code
There is no test code in this module. If you run it as a script, it simply executes the cli() function and runs the program.
if __name__ == "__main__":
    cli()
I saved the cli.py module. I can test it by calling the module as follows:
(.venv) $ cd ../..
(.venv) $ python -m dbapp.interface.cli --help
The above command should display the help text generated by the argparse library, as shown below:
usage: cli.py [-h] [-v] {read,r,read_users,u,read_labels,l,write,w,delete,d,del} ...

Database Application

options:
  -h, --help            show this help message and exit
  -v, --version         show program's version number and exit

subcommands:
  {read,r,read_users,u,read_labels,l,write,w,delete,d,del}
    read (r)            Display rows that match name and label.
    read_users (u)      Display all users in the database.
    read_labels (l)     Display labels used by a user.
    write (w)           Add new data. Enter user name, label, and data.
    delete (d, del)     Delete rows that matche name and label.
I can also use the sub-commands, as shown below:
(.venv) $ python -m dbapp.interface.cli read_users
Bill
Jane
Walter

(.venv) $ python -m dbapp.interface.cli read_labels Bill
Notes
directions

(.venv) $ python -m dbapp.interface.cli read Bill Notes
User: Bill,  Label: Notes,  Data: makes some notes,  Time: 2023-11-06 14:02:12.044012
The __main__.py program
So that the package runs when the dbapp package is called, I need to create a module named __main__.py in the dbapp package directory, which will run when the package is run.
(.venv) $ cd ..
(.venv) $ nano __main__.py
The __main__.py is the entry point to the program, when running it as a package. It simply calls the dbapp.interface.cli.cli() function, which runs the cli program.
The __main__.py module is shown below:
# dbproject/src/dbapp/__main__.py

import dbapp.interface.cli

def main():
    dbapp.interface.cli.cli()

if __name__ == "__main__":
    main()
To test the __main__.py module, run the dbapp package in the Python intepreter. For example:
(.venv) $ cd ..
(.venv) $ python -m dbapp read_users
Bill
Jane
Walter
(.venv) $ python -m dbapp write user1 label100 "test data 1"
User 'user1' added data labeled 'label100'.
(.venv) $ python -m dbapp write user2 label200 "more test data"
User 'user2' added data labeled 'label200'.
(.venv) $ python -m dbapp read_users
Bill
Jane
Walter
user1
user2
(.venv) $ python -m dbapp read_labels user1
label100
Packaging the application
To make it easy for others to use this program I packaged it as a wheel. I do not intend to publish a "toy" program like this to PyPI so I performed a simpler packaging procedure than would normally be required. If I needed to distribute the package so that a colleague could install it on their PC, I would just send them a link to a shared folder that contains the wheel file.
The pyproject.toml file
In the dbproject directory, I built a wheel using the setuptools package. First, I created a pyproject.toml file that provides setuptools with the information it needs to build the dbapp package.
(.venv) $ deactivate
$ cd ..
$ nano pyproject.toml
The pyproject.toml file looks like the listing below:
# dbproject/pyproject.toml

[build-system]
requires = ["setuptools"]
build-backend = "setuptools.build_meta"

[project]
name = "dbapp"
version = "0.1"
requires-python = ">=3.10"
dependencies = ["SQLAlchemy","psycopg2","python-dotenv"]

[tool.setuptools.packages.find]
where = ["src"]
include = ["dbapp*"]
exclude = ["tests", "docs"]

[project.scripts]
dbapp = "dbapp.__main__:main"
I set the entry point to be the main() function in the dbproject/src/dbapp/__main__.py module. Setuptools does not allow me to run the dbproject/src/dbapp/__main__.py module as a script. It imports the main() function instead, which then runs the main program.
Build the dbapp package
To build the dbapp package, I created a new virtual environment for building the package and install the wheel and build tools.
$ python3 -m venv .bld
$ source .bld/bin/activate
(.bld) $ pip install wheel
(.bld) $ pip install build
The, build the dbapp package
(.bld) $ python -m build
After the build is complete, the wheel should be in a new directory under the project folder named dist.
(.bld) $ ls dist
dbapp-0.1-py3-none-any.whl  dbapp-0.1.tar.gz
Test the dbapp wheel
To test the wheel, I installed it in a new virtual environment.
$ (.bld) deactivate
$ python3 -m venv .venv2
$ source .venv2/bin/activate
(.venv2) $ pip install dist/dbapp-0.1-py3-none-any.whl
Then, I ran the program as shown below:
(.venv2) $ dbapp read_users
I encountered an error because the application could not find the database.
sqlalchemy.exc.OperationalError: (psycopg2.OperationalError) connection to server on socket "/var/run/postgresql/.s.PGSQL.5432" failed: No such file or directory
        Is the server running locally and accepting connections on that socket?
The error occurred because the environment variables that describe the database connection information are not defined. The dbapp package does have a copy of the .env file in its directory. This is a good thing, because the .env file can contain sensitive information that you don't want to distribute to just anyone. And, in this case, every user may want to use a different database and so I created the environment variables that describe their database in their shell, as shown below:
(.venv2) $ export DB_SERVER_ADDRESS=localhost
(.venv2) $ export DB_SERVER_TCP_PORT=5432
(.venv2) $ export POSTGRES_DB=userdata
(.venv2) $ export POSTGRES_USER=userdata
(.venv2) $ export POSTGRES_PASSWORD=abcd1234
Now, the program will run.
When I am testing, I prefer to re-use the .env file that is in the dbapp directory to create the environment variables. So, instead of exporting environment variables one-by-one, I ran the following command while in the dbproject directory:
(.venv2) $ set -a; source src/dbapp/.env; set +a
This reads in the variables in the .env file and exports them as environment variables.
When the environment variables have been set -- and, they can be set many different ways -- I can run the application from any directory on my PC:
(.venv2) $ cd $HOME
(.venv2) $ dbapp u
Bill
Jane
Walter
user1
user2
(.venv2) $ dbapp l Jane
description
directions
(.venv2) $ dbapp r Jane directions
User: Jane,  Label: directions,  Data: Go north then east,  Time: 2023-11-06 14:02:12.044012
Clean up
Now that I have finished developing and testing the dbapp program, I shut down the virtual environment and the database server:
(.venv2) $ deactivate
$ rm -r .venv2
$ rm -r .bld
$ docker stop postgres_db
Conclusion
I created a Python database application and practiced building relationships between database tables, writing to and reading from a database, and building a command-line intefrace. While working on this project, I learned more about structuring Python projects, how to handle module namespaces in import statements, and basic database relationships. I actually learned a lot about database relationships but I decided that topic would be better covered in another post. I also learned a lot about the Python libraries that support command-line interfaces and will write more about those in yet another post.
If I plan to further explore using database relationships and constraints to simplify my Python program code, I need to finally learn Python type hints, which makes it much easier to read and understand the database models in the Python code, and type hints are the "modern" way to work with database models in SQLAlchemy.
-
See also the following blog posts: Packaging a python library, and Testing & Packaging ↩
-
Alternatively, one can export environment variables from the dotenv file to the shell environment. Then, set each of the container's environment variables using the shell variables. I that case, I would load the environment variables in my dotenv file into my Bash shell, then run my Docker command. I could have used the Bash shell's set builtin to temporarily modify my Bash shell so each variable sourced from the dotenv file is given the export attribute and marked for export to the shell environment. Then, I would run the command:
set -a; source .env; set +a↩ -
From StackOverflow answer #49643793: "What is the best method for setting up a config file in Python?" ↩